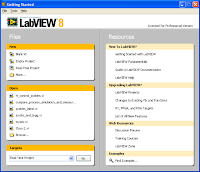
 1. Launch LabVIEW (if it's been open, you can quit it first).
2. At the LabVIEW Getting Started dialog, click Blank VI to create a new blank VI (the Blank VI option is found under the New heading, and you have to click on the "Blank VI" text, not the icon). An "Untitled 1" VI front panel will appear on your screen.
Go to the floating Controls palette and navigate (by clicking) to the Modern Graph, subpalette, shown in Figure 17. If the Controls palette isn't visible, select View Controls Palette from the menu to make it visible. Also, make sure the front panel window is active, or you will see the Functions palette instead of the Controls palette.
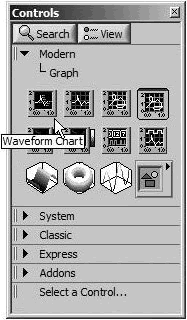
Figure 17. Modern Graph palette showing the Waveform
Chart and various other charts and graphs
On the Graph subpalette, select Waveform Chart by clicking it with the mouse button.
You will notice that, as you run the cursor over the icons in the Controls palette and subpalettes, the selected button or icon's name appears in a tip strip, as shown in Figure 17.

Positioning Tool
You will see the outline of a chart with the cursor "holding" it, as shown in Figure 18. Position the cursor in a desirable spot on your front panel and click. The chart magically appears exactly where you placed it, as shown in Figure 3.19. If you want to move it, select the Positioning tool from the Tools palette, and then drag the chart to its new home. If the Tools palette isn't visible, select View , Tools Palette from the menu.
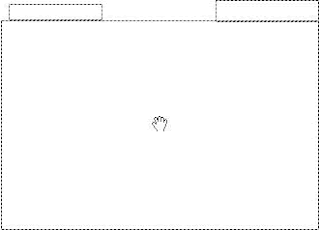
Figure 18. Waveform Chart after it has been
dragged onto the front panel (and before it has been dropped)
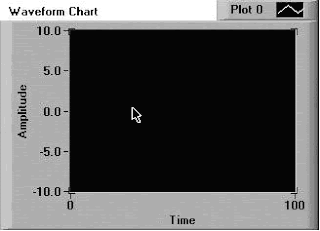
Figure 19. Waveform Chart after it has been dropped onto the front panel
3. Go back to the Modern subpalette; then navigate into Boolean subpalette, and choose Stop Button (see Figure 20).
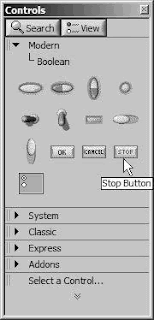
Figure 20. Modern , Boolean palette showing the
Stop Button and other Boolean controls and indicators
adding a Waveform Chart and Stop Button
4. Now change the chart's Y-axis scale range from -10 thru +10 to 0 thru 1. Highlight the number "10" (Y-axis range max) by click-dragging or by double-clicking on it with the Text Edit tool. Now type in 1.0 and click on the enter button that appears in the Toolbar at the top of the window. Change -10 (Y-axis range min) to 0 in a similar manner.

Enter Button
5. Switch to the block diagram by selecting Show Block Diagram from the Window menu. You should see two terminals already there, as shown in Figure 22.

Figure 22. Your VI block diagram, showing the
Stop Button and Waveform Chart terminal
6. Now you will put the terminals inside a While Loop to repeat execution of a segment of your program. Go to the Programming , Structures subpalette of the floating Functions palette and select the While Loop (see Figure 23). Make sure the block diagram window is active, or you will see the Controls palette instead of the Functions palette.
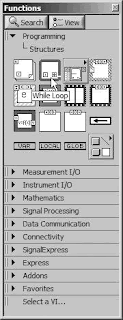
Your cursor will change to a little loop icon. Now enclose the DBL and TF terminals: Click and hold down the mouse button while you drag the cursor from the upper-left to the lower-right corners of the objects you wish to enclose (see Figure 24).
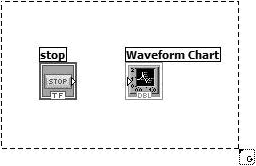

Figure 23. Programming , Structures palette showing
a While Loop and other LabVIEW structure
Your cursor will change to a little loop icon. Now enclose the DBL and TF terminals: Click and hold down the mouse button while you drag the cursor from the upper-left to the lower-right corners of the objects you wish to enclose (see Figure 24).

Figure 24. Dragging the mouse cursor around a region of code
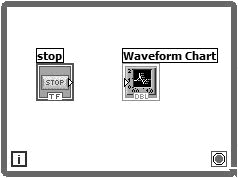
When you release the mouse button, the dashed line that is drawn as you drag will change into the While Loop border (see Figure 25). Make sure to leave some extra room inside the loop.
7. Go to the Functions palette and select Random Number (0-1) from the Programming , Numeric subpalette. Place it inside the While Loop.
8. With the Positioning tool active, arrange your diagram objects so that they look like the block diagram in Figure 26.

Positioning Tool
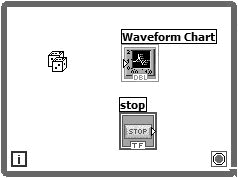
9. With the Wiring tool active, click once on the Random Number (0-1) icon, drag the mouse over to the Waveform Chart's terminal, and click again (see Figure 27).
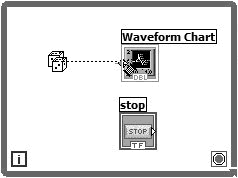
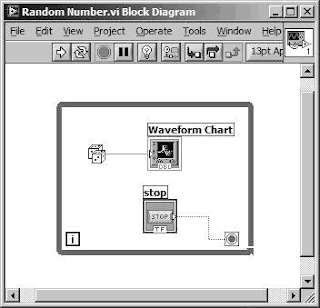
You should now have a solid orange wire connecting the two icons, as shown in Figure 28. If you mess up, you can select the wire or wire fragment with the Positioning tool and then hit the key to get rid of it. Now wire the Boolean TF terminal to the conditional terminal of the While Loop. The loop will execute while the switch on the front panel is FALSE (not pressed down) and stop when the switch becomes TRUE (pressed down).
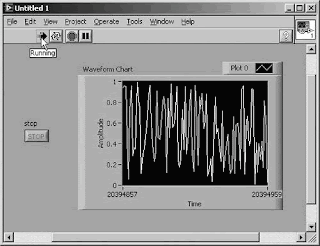
10. You should be about ready to run your VI. First, switch back to the front panel by selecting Show Front Panel from the Window menu. Now click on the run button to run your VI. You will see a series of random numbers plotted continuously across the chart. When you want to stop, click on the stop Boolean button using the Operating tool (see Figure 29).
11. Create a directory or folder called MYWORK in a convenient location (such as your home or documents directory). Save your VI in your MYWORK directory or folder by selecting Save from the File menu and pointing out the proper location to save to. Name it Random Number.vi.

Figure 25. A While Loop containing the code
that was enclosed by the dragged region
7. Go to the Functions palette and select Random Number (0-1) from the Programming , Numeric subpalette. Place it inside the While Loop.
8. With the Positioning tool active, arrange your diagram objects so that they look like the block diagram in Figure 26.

Positioning Tool

Figure 26. Your block diagram after
placing the Random Number (0-1) function
9. With the Wiring tool active, click once on the Random Number (0-1) icon, drag the mouse over to the Waveform Chart's terminal, and click again (see Figure 27).

Figure 27. Your block diagram, as you
drag a wire from the Random Number (0-1)
function to the Waveform Chart terminal.
You should now have a solid orange wire connecting the two icons, as shown in Figure 28. If you mess up, you can select the wire or wire fragment with the Positioning tool and then hit the

Figure 28. Your block diagram after
completing the wiring task
10. You should be about ready to run your VI. First, switch back to the front panel by selecting Show Front Panel from the Window menu. Now click on the run button to run your VI. You will see a series of random numbers plotted continuously across the chart. When you want to stop, click on the stop Boolean button using the Operating tool (see Figure 29).

Figure 29. Your VI front panel
after pressing the Run button
11. Create a directory or folder called MYWORK in a convenient location (such as your home or documents directory). Save your VI in your MYWORK directory or folder by selecting Save from the File menu and pointing out the proper location to save to. Name it Random Number.vi.

No comments:
Post a Comment